
Designing a Garden from Scratch: The Site Analysis
Before you start designing your dream garden, you should spend some time to analyse your current site.


Designing a home garden can be a very rewarding task, but all too often people find they don't know where to start. Today's post is the first in a new series where I will explain a simple process to follow for creating a garden design.
Before you start designing your dream garden, you should spend some time to analyse your current site. In doing so, you will better understand the opportunities, limitations, and existing assets of your outdoor space and how they relate to your indoor space. This first step in the garden design process is the Site Analysis.
Site Map
Your site analysis is best done by making notes on a simple site map of your garden. It is possible that you might have a plan of your property in the paperwork you received when buying your home. If not, there are several resources online that can help you create this map.
Find your home on Google Earth or Bing Maps (sometimes the satellite imagery is better on one over the other), and then take a screenshot of the overhead image of your property. If there is a lot of tree cover that makes it difficult to trace it off satellite images, then you be may able to find basic maps of your property lines through local government websites.

In this screenshot from Bing Maps, we have a relatively clear view of the property in the middle to aid in tracing. Despite the tree cover at the end of the lot, we can assume that boundary by tracing the edge of the garden below and extending the line.
At this point, you can either use software to trace the outline of your house and the property boundaries, or you can print it out and trace it by hand using tracing paper. If you trace it by hand, make a scan of it so that you can print out extra copies. This will also allow you to resize it to create a bigger map for taking notes on once you start your analysis.
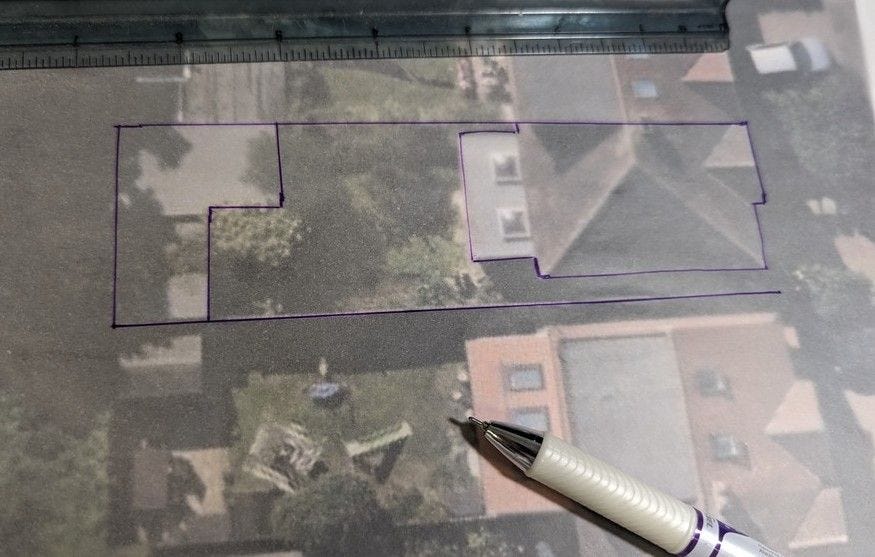
Hand-traced outline, created from the previous screenshot. Because I used a zoomed out view to include adjacent properties to aid in my tracing, this should be scanned and enlarged for the site analysis sheet.
If you are having a hard time finding a way to create a map from the online map services, make your best attempt to create a hand–drawn outline using basic measurements. At this point, exact measurements are not essential.
Using Existing Site Plans
You may have an existing site plan, possibly created when major renovations were planned in the past or for the original construction of your home.
It is still a good idea to trace an outline of this so that you have simpler version that removes details like contour lines and spot elevations. Tracing the outline will also help ingrain the layout of your site into your mind.
You may also notice some inaccuracies between the plan and satellite images of your site, which you can correct in your site plan. Again, accurate measurements are not needed at this stage, so don't worry too much about getting the adjustments exactly to scale, just enough so that you will remember that the site plan needs to be corrected when you get to your final scale-drawing design.
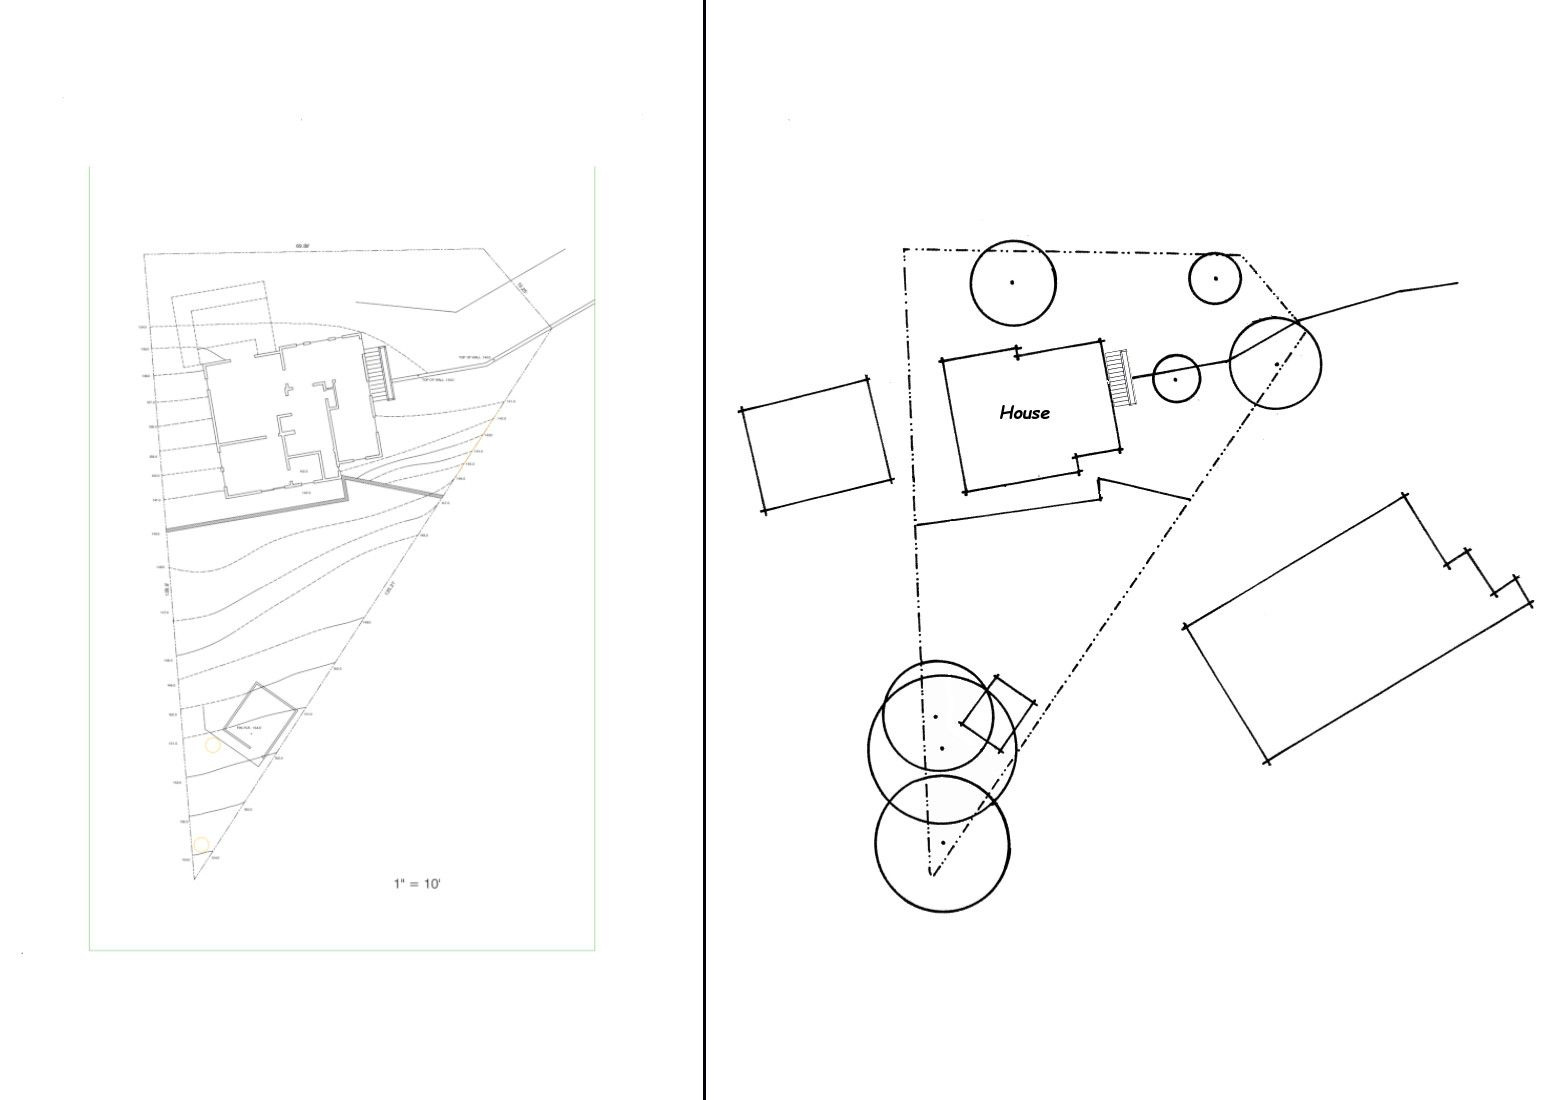
In this example, I had a copy of a site plan for the original construction of the house (left image). When I compared it to satellite imagery I noticed that the house was not in exactly the same position as the plan, so I moved it over in the hand-drawn site plan (right image). I also added trees and neighboring residences by tracing their outlines from the satellite image.
Analysis: Inventory
Now that you have a basic site map, you can begin the analysis by taking an inventory of what you currently have in the garden. Your inventory should note on the map where you have existing features. This will include outdoor structures, plants, trees, pathways, entry points, patios, lawn areas, fences, retaining walls, etc.
Even if you have no intention of keeping any of these features, make a note of it all. Make a note of any issues you find with any of these features such as a leaning fence or a tree that is in poor health.
If the property is on a hill, make a note of this and get some altitude measurements using Google Earth so that you can calculate the pitch of the slope. This will be useful if you plan any stepped walkways along the slope.
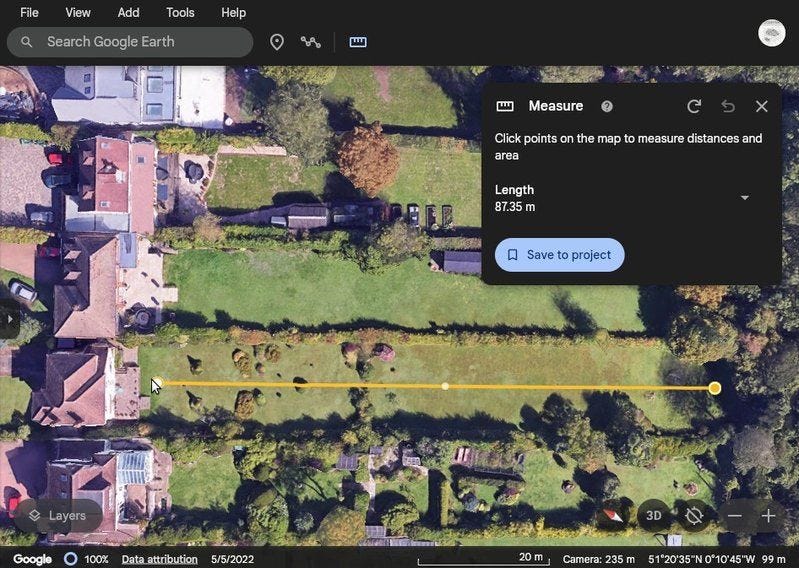
Using Google Earth, you can measure distances and elevation. In this example, the elevation at the cursor is 99m, as displayed in the lower right corner of the screen. At the other end of the yellow line, the elevation is 89m, showing that the garden slopes down from the house with 11% grade.
The goal for the inventory is to completely understand the existing features. You don't need to make any notes on how you feel about these features, just the factual information.
Analysis: Environment
The next step is to assess how external factors impact your garden space.
Note the direction of the sun as it passes over your property. If the area is generally sunny but has some areas of consistent shade, make a note of this, and vice versa if the area is mostly shady.
Make a note of the views from the garden, both good and bad. You should also analyse the privacy of the space, for example, neighboring houses may have a clear view into your private space.
Note how surface water travels in your garden. Are there areas where rainwater does not drain well and starts pooling, or running off into other areas? Is there a drainage system in place to move excess rainwater off your property?
Other environmental factors worth noting are any significant winds, overhead utility lines, external noise and any evidence of wildlife incursions.
Analysis: Circulation
The third set of data you should collect for your site analysis is a survey of existing circulation.
For this part of the analysis, make notes on how one navigates across the site. Is there a garden path, and does it connect to the areas of the garden you need to get to? Don't get to distracted thinking about how to improve the circulation, you can worry about that after the analysis is complete.
You will already have made a note of entry points in the inventory, now you should make notes on how those entry points affect the space.
Questions you might ask yourself include: Do you have access to the garden from the front of your property via a side walkway? Is the side walkway easily navigable? Do any of the alternative entries other than from your back door connect to anything of value such as a footpath that leads you to the local park? If you have a garage and/or a driveway in your garden, make a note of how vehicles access the space (bicycles as well as cars).
Putting it all Together
After you have completed these 2 steps in the analysis, you may end up with so much information from each stage that you end up with 3 site analysis maps. This is where using tracing paper is beneficial so that you can layer each map over the other to see how the elements affect each other.
This multi-page view may be difficult to read, so you should consolidate your analysis into a single map, and simplify by only including the most pertinent elements. Even if you have all your analysis on one sheet, it is still useful to recreate it and make a more polished version as that will help to reinforce your memory of the data. You should now have a site analysis that looks something like the following example.
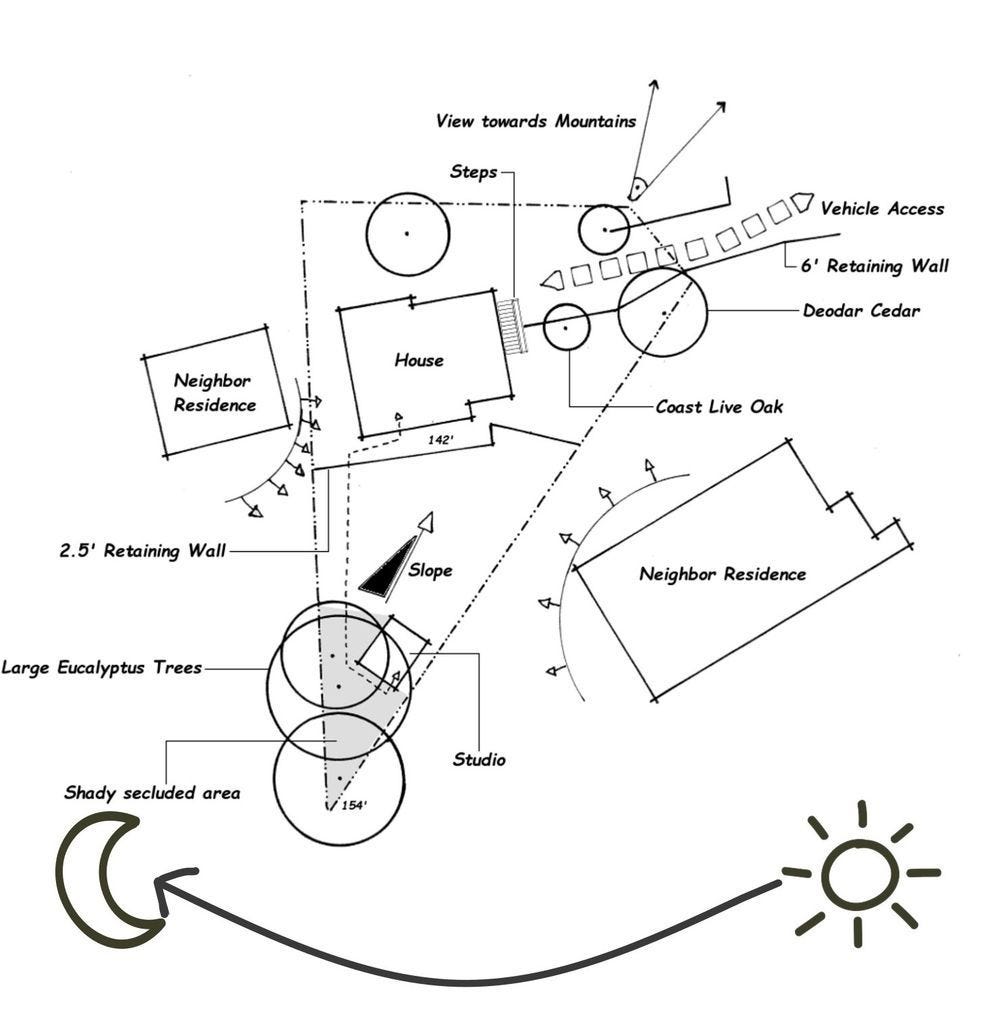
For this example, the most important elements that I felt would influence my design were the sloping nature of the garden (12ft elevation difference from front to back), the mostly sunny aspect with an existing shady area, clear views out to nearby mountains and the lack of privacy due to the neighbor's homes overlooking the property on the East and West sides.
Now that you have the site analysis completed, you can keep this on hand when designing your landscape, to ensure it is suitable to the site. In addition to having this as a reference, you will have a better mental picture of your garden than you had previously.
Even if you don't plan on doing the design yourself, creating a site analysis is still a good exercise to undertake. If you hire a garden designer, make sure they do a site analysis and be wary of a designer that does not do a site analysis as their preferred method may be to apply the same template for every garden they design. Even if they do a site analysis, offer to show them yours as you probably know more than they can deduce during a brief visit to your property.